Use CC Switch with Models Hub: One-Click Import from Tokens
Import configuration into CC Switch with one click from the Models Hub token dropdown, writing straight into Claude Code, Codex, or Gemini CLI, with verification and error troubleshooting.
CC Switch is an open-source, cross-platform manager for switching provider configurations between Claude Code, Codex, and Gemini CLI. It supports the ccswitch:// deep link protocol, so it can import configuration directly from the Models Hub token management page — no manual base URL or key entry required.
Three things you need
A Models Hub token, CC Switch installed, and your model tiers picked. The whole flow runs through a deep link, so you never copy-paste an API key by hand.
Prerequisites
- CC Switch installed. On macOS, Homebrew is recommended:
brew tap farion1231/ccswitch && brew install --cask cc-switch. On Windows/Linux, download the installer from Releases. - A Models Hub API key (a token), created on the Tokens page. The token's group must have access to the models you plan to use.
Recommended models
CC Switch manages Claude models across three tiers: Haiku, Sonnet, and Opus.
| Tier | Model | Pricing | Live status |
|---|---|---|---|
| Main / Sonnet tier | claude-sonnet-4-6 | Price | Availability and latency |
| Opus tier, harder refactors | claude-opus-4-6 | Price | Availability and latency |
| Haiku tier, lightweight tasks | claude-haiku-4-5 | Price | Availability and latency |
Model names are authoritative on the pricing page.
Setup
Step 1 — Start the import from the Tokens page
On the Models Hub Tokens page, open the dropdown for the token you want to use and select CC Switch. This launches the CC Switch app and opens a configuration dialog automatically.
Step 2 — Complete the dialog
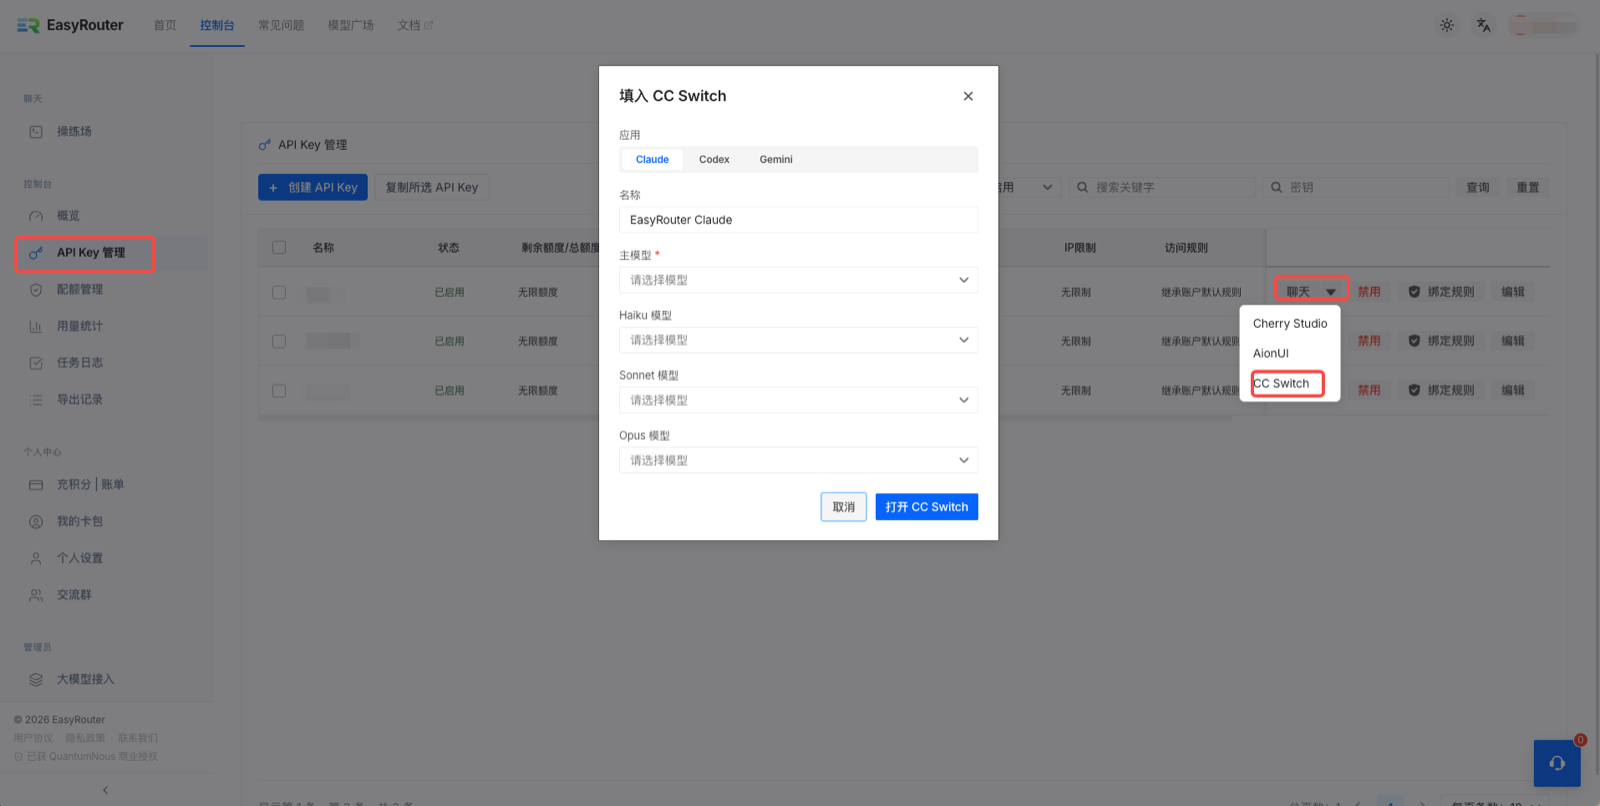
Fields in the dialog:
| Field | Description |
|---|---|
| App | Switch between Claude / Codex / Gemini at the top; pick the target app |
| Name | A name for this configuration (e.g. My Claude) so you can recognize it later in CC Switch |
| Main model (required) | The primary model used by default |
| Haiku / Sonnet / Opus model | The lightweight, balanced, and strongest tiers respectively — pick from the dropdowns; unselected tiers show "Please select a model" |
Step 3 — Confirm the import
After clicking Open CC Switch, the client shows a confirmation dialog automatically:
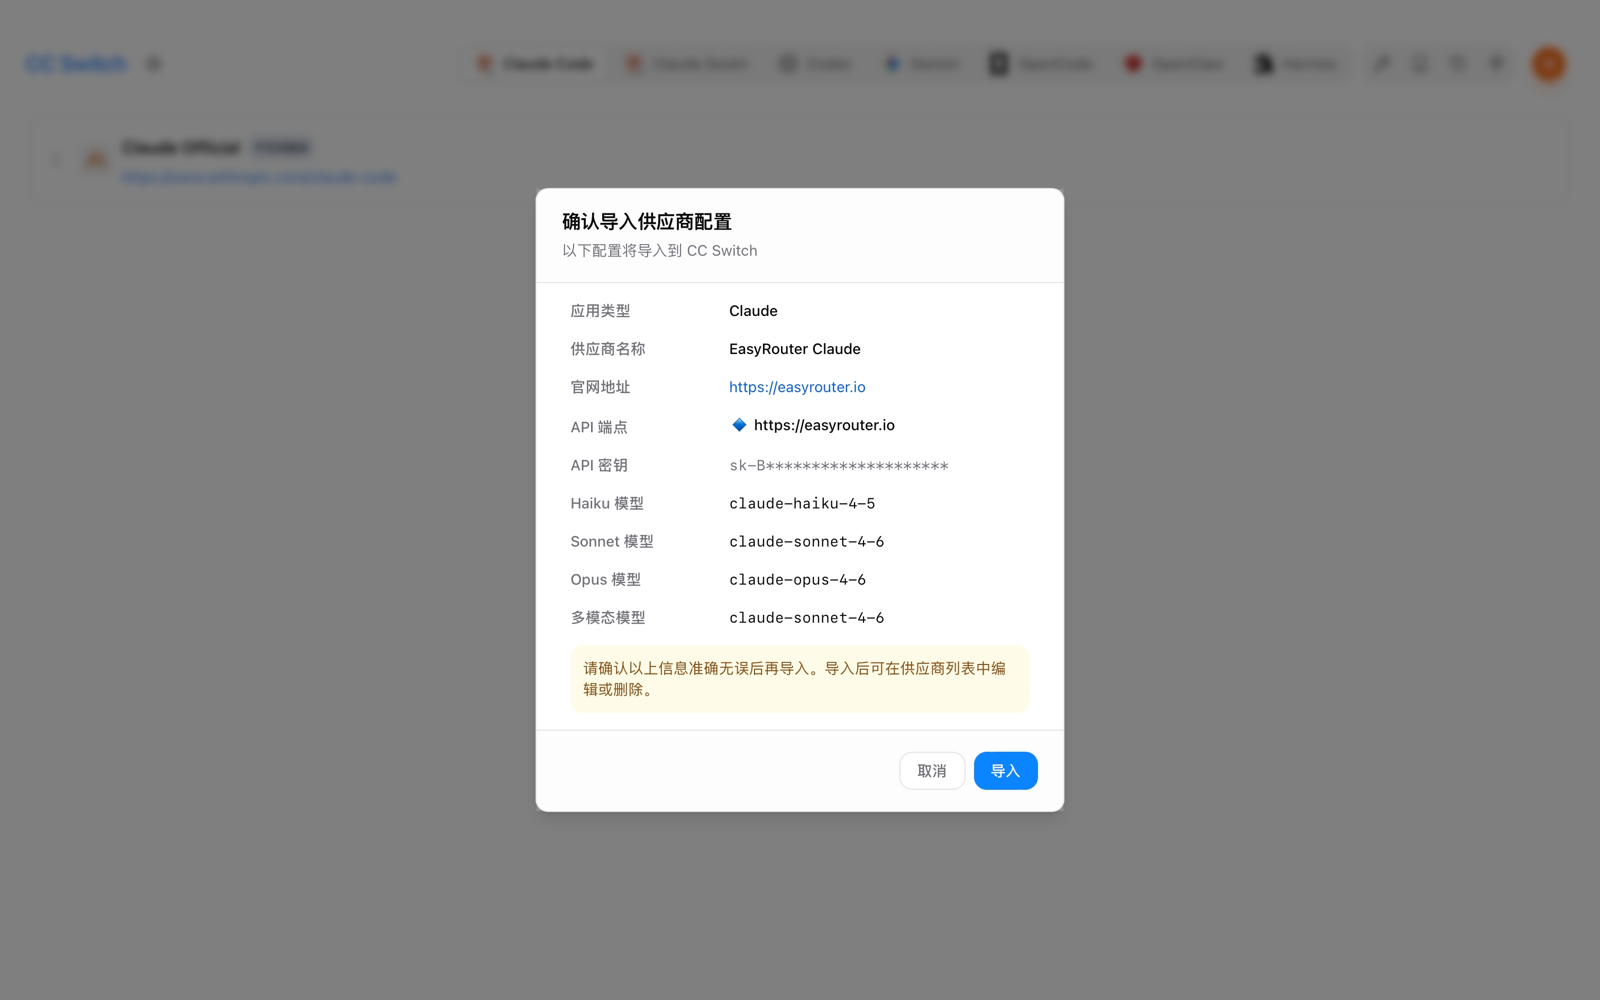
Click Import to finish, or Cancel to back out.
Verify
After importing, CC Switch sets this configuration as the active provider for the target app (Claude Code / Codex / Gemini CLI). Open that app and send a test message; a normal reply means you're connected. Then open Usage logs in the Models Hub console; a request under your configured model name appears within seconds.
Common errors
| Symptom | Cause | Fix |
|---|---|---|
| Clicking CC Switch does nothing | CC Switch isn't installed, or the ccswitch:// protocol isn't registered on this machine | Install CC Switch, then click the option again |
| A tier still shows "Please select a model" | You didn't pick a model for that tier | At minimum select the main model; other tiers can be left empty |
| The app still uses the old configuration | The target app hasn't switched to the newly imported provider | Select and activate the new configuration manually inside CC Switch |
401 / authentication failure | The token was disabled, or you imported a stale configuration | Go back to the Tokens page and start the import again |
| Model not found | The model name selected during import has since been retired on Models Hub | Re-import and pick the current name from the pricing page |
More in Troubleshooting.
FAQ
How is it billed? Per input and output token actually consumed, at the price on each model's pricing page; every request is itemized in usage logs.
How is this different from manually configuring Claude Code / Codex / Gemini CLI? The result is identical — CC Switch just replaces manual config-file editing with a graphical import, and lets you switch between multiple provider profiles quickly.
Can I skip the deep link and configure CC Switch manually? Yes. CC Switch also supports adding a provider by hand — just fill in the Models Hub base URL and API key — it's just less convenient than the import dialog.
Related
- CLI one-command setup: the Models Hub CLI supports Claude Code, Codex, Gemini CLI, and OpenClaw
- Model pricing and model status
- Claude Code setup, Codex CLI setup
Use Hermes Agent with Models Hub: Custom Endpoint Setup
Point Hermes Agent's Custom Endpoint at Models Hub through the hermes model menu, so terminal tool calls and skills run on your Models Hub balance, with recommended models and error fixes.
Use Cherry Studio with Models Hub: Add a Provider and Models
Add Models Hub as a custom provider in Cherry Studio, fill in the API key and API host, then chat with Claude, GPT and more, with verification and error troubleshooting.